


Sometimes, trading can feel like you’re doing it all alone.
You look at charts and numbers, make decisions, and trade — often without talking to anyone else.
But what if trading could be more fun and social?
PVP.trade is a website that makes trading a team sport.
It’s a place where people can share ideas, compete with friends, and celebrate when things go well.
Here are some fun facts about PVP.trade:
Over 11,000 people use PVP.trade every month!
Since they started giving out points in July 2024, they’ve given out almost a million points (777,696 to be exact!).
One of the current campaigns offers 1,000,000 points for distribution among traders based on their trading activities, incentivizing engagement.
Kinda interesting, right?
Let’s dive deep to understand the PVP.trade, focusing on:
What is PVP.trade?
How to Use it?
How it works and build your own?
What is pvp.trade?

Imagine trading with your friends on your telegram!
That’s what PVP.trade lets you do.
By leveraging the Hyperliquid exchange, offering access to over 150 trading pairs, it allows users to execute trades, track positions, and manage their portfolios using simple commands.
The platform is designed for both novice and experienced traders, offering a gamified experience that encourages participation and interaction.
Key Features
User-Friendly Commands: Traders can execute commands like
/long,/short,/stoploss, and/takeprofitto manage their trades efficiently.

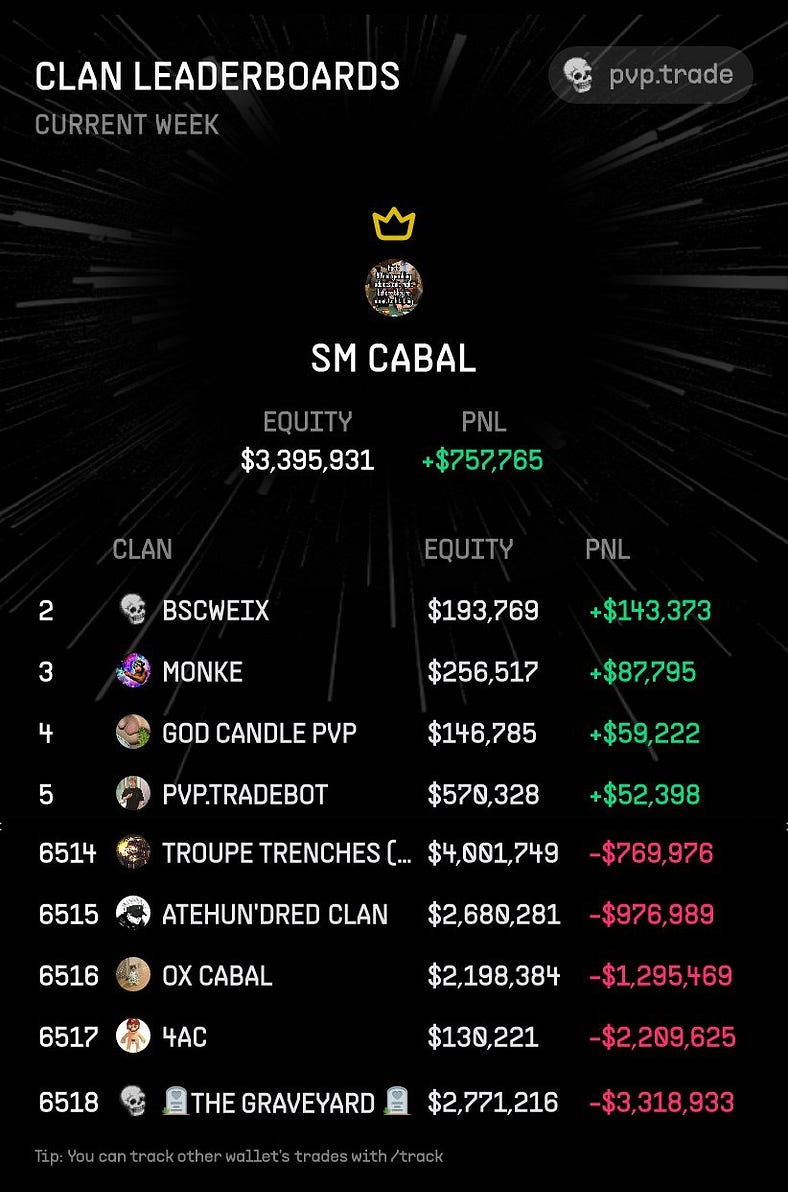
Community Engagement: It support clan systems where users can form groups, share insights, and compete for leaderboard positions.
Point Rewards System: Users earn points through trading activities and referrals, which may convert into future $PVP tokens.
What makes PVP.trade special?
You can trade right on your phone, with your friends, in the same app you use to chat!
Trading becomes a game with leaderboards and points, making it more fun to learn.
PVP.trade operates across multiple blockchains, including Ethereum and Solana, giving you more choices.
Users can start trading with as little as 10 USDC, so almost anyone can try it.
Want to build something DOPE in the Web3 Ecosystem?
Reach out to us through:
LinkedIn | Telegram | Website | Book a Call
Let’s discuss your needs and launch quickly!
How to use pvp.trade?

1. Set Up the Bot
Open Telegram and search for “PVP.trade.”
Start the Bot by clicking on it and sending
/startto begin onboarding.
2. Deposit Funds

Minimum Deposit: 10 USDC.
Supported Networks: Hyperliquid, Arbitrum, Solana.
Deposit: Follow the bot’s instructions to send funds to the provided wallet address.
3. Explore Markets

View Markets: Send
/marketsto see available perpetual markets and trading options.
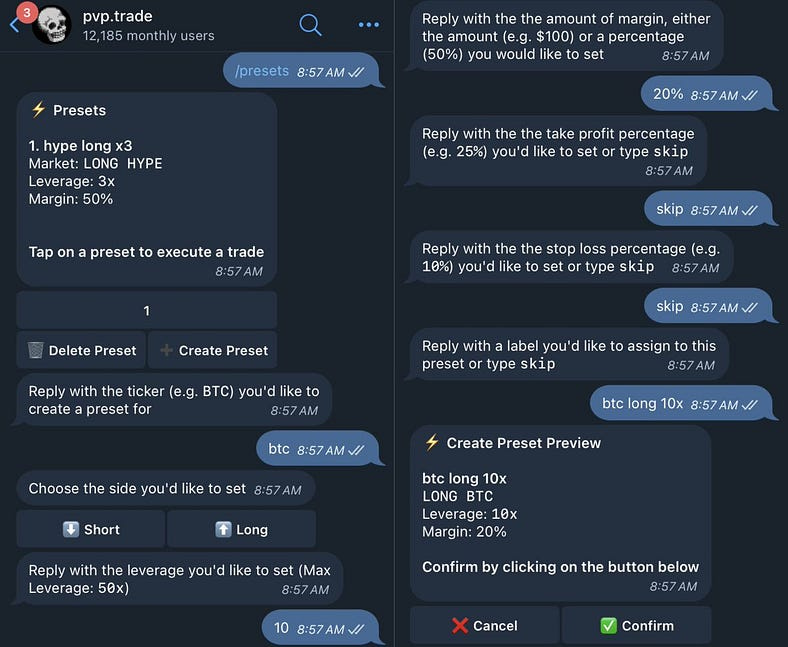
Executing Trades

Open a Position
Choose Position: Send
/longor/short.Set Parameters:
Ticker Symbol
Leverage (e.g., 2x, 5x)
Margin Amount
Review Details: Check position size and liquidation price.
Confirm: Follow prompts to execute. Trades are shared in your group chat.
Track Trades
View Positions: Send
/positionsfor real-time updates on your trades.
Advanced Trading Tools
Stop Loss/Take Profit: Set with
/stoplossand/takeprofitto automate exits.Charts: Use
/chartto view price charts for different timeframes.Activity: Send
/statsto see your trading volume and performance.
How does pvp.trade works?
PVP.trade has revolutionized crypto trading by seamlessly integrating with Telegram.
If you’re a business owner, exchange owner (DEX or CEX), or developer looking to capitalize on this model and build a similar platform, here’s a deep dive into its architecture to empower you to create your own solution:
I. The User Experience:
This section focuses on how users interact with the platform.
A. Telegram Bot as the Primary Interface:
PVP.trade cleverly leverages Telegram’s existing infrastructure.
Instead of requiring users to download a separate app, it uses a Telegram bot as the main point of interaction.
This offers several advantages:
Reduced Friction: Users are already familiar with Telegram, eliminating the learning curve associated with a new platform.
Accessibility: Telegram is widely available on various devices, making the trading platform accessible to a broad audience.
Social Integration: Trading can be integrated into existing Telegram communities and group chats, fostering a social trading environment.
B. Command-Based Interaction:
The bot responds to simple text commands, making trading accessible even to novice users.
Examples include:
/start: Initiates the bot and starts the onboarding process./balance: Checks the user's account balance./markets: Displays available trading markets./buy [symbol] [amount]: Executes a buy order./sell [symbol] [amount]: Executes a sell order./positions: Shows the user's open positions./leaderboard: Shows the clan leaderboards.
This command-based approach simplifies the user interface, making it clean and efficient.
C. User Onboarding:
A well-designed onboarding process is crucial for user adoption.
PVP.trade includes:
Welcome Message: A clear explanation of the platform’s purpose and how to use it.
Account Setup: Instructions on linking a wallet or creating a new account.
Deposit Instructions: Guidance on depositing funds into the trading account.
D. Real-Time Feedback and Notifications:
The bot provides immediate feedback on user actions, such as trade confirmations, balance updates, and order status changes.
This real-time interaction significantly enhances the user experience.
II. The Trading Engine (Backend)
This section dives into the server-side components that handle the core trading logic.
A. Setting up Cloud Infrastructure:
Platform Choice: Select a cloud provider like AWS, Google Cloud, or Azure. Each offers similar services, so consider factors like pricing, existing infrastructure, and developer familiarity.
Server Setup: Provision virtual servers (instances) to host your backend services. Start with a few and scale as needed.
Load Balancing: Implement load balancing to distribute traffic across multiple servers, ensuring high availability and preventing overload.
Infrastructure as Code (IaC): Use tools like Terraform or CloudFormation to manage your infrastructure as code, making it easier to automate deployments and manage changes.
B. Implementing Microservices:
Service Decomposition: Break down your backend into logical services. Examples:
User Service: Manages user accounts, authentication, and profiles.Trading Service: Handles order processing, trade execution, and portfolio management.Market Data Service: Retrieves and provides market data (prices, order books).Notification Service: Sends real-time updates to users via the Telegram bot.Communication: Define clear APIs (using REST or gRPC) for communication between services.
Containerization (Docker): Package each service in a Docker container for easy deployment and management.
Orchestration (Kubernetes): Use Kubernetes to manage and scale your microservices.
C. Choosing a Database:
Data Modeling: Design your database schema based on the data you need to store (users, trades, order books, etc.).
Database Selection:
Relational Databases (PostgreSQL, MySQL): Choose these if you have structured data and require complex relationships and transactions (e.g., financial transactions).
NoSQL Databases (MongoDB, Cassandra): Choose these for high-volume data, real-time updates, and flexible schemas (e.g., storing market data or user activity logs).
Database Deployment: Deploy your database on a managed database service (e.g., AWS RDS, Google Cloud SQL) for easier management and scaling.
D. Building the Order Management System (OMS):
Order Processing: Implement logic to handle different order types (market orders, limit orders, stop-loss orders).
Order Matching: Design an efficient order-matching algorithm to match buy and sell orders.
Order Book Management: Maintain a real-time order book to track pending orders and market depth.
Integration with Exchange APIs: Connect the OMS to exchange APIs to send and receive orders.
Performance Optimization: Optimize the OMS for low latency and high throughput to handle large trading volumes.
III. APIs and Integrations:
This section explains how different parts of the system communicate with each other and external services.
A. Integrating with Exchange APIs:
This guide details how to connect your trading platform to cryptocurrency exchanges (or your own DEX/CEX) via their APIs.
Choosing Your Exchange:
Identify Target Exchanges: Decide which exchanges you want to support based on factors like:
Trading volume and liquidity
Available trading pairs
API documentation and features
Security and reputation
If you own the DEX/CEX, this step is already done.
Obtaining API Credentials:
Register an Account: Create an account on each exchange you want to integrate with (if you don't own the exchange).
Navigate to API Settings: Find the API settings or API key management section in your account settings.
Create API Keys: Generate new API keys. You’ll typically get two keys:
API Key (Public Key): This identifies your application.
Secret Key (Private Key): This is used for authentication and should be kept absolutely secret. Never share your secret key!
Set Permissions:
Configure the permissions for your API keys.
Grant only the necessary permissions (e.g., read market data, place orders, access balances).
Avoid granting full access unless absolutely required.
Designing Your API Calls:
Consult the API Documentation:
Carefully review the exchange’s API documentation.
It will provide details on available endpoints, request parameters, response formats, and rate limits.
Implement API Calls in Your Code:
Use HTTP requests (e.g., using libraries like requests in Python or axios in Node.js) to interact with the exchange's API for:
Order Placement
Market Data
Authentication
Implementing Error Handling:
Handle HTTP Status Codes: Check the HTTP status codes of API responses (e.g., 200 OK, 400 Bad Request, 500 Internal Server Error) to identify errors.
Parse Error Messages: Extract error messages from the API responses to provide informative feedback to users.
Implement Retry Mechanisms: Implement retry mechanisms with exponential backoff to handle temporary network issues or exchange outages.
Rate Limiting: Respect the exchange’s API rate limits to avoid being blocked. Implement logic to handle rate limit errors and retry requests after appropriate delays.
B. Utilizing the Telegram Bot API:
This section details how to create and integrate your Telegram bot:
Creating Your Telegram Bot:
Open BotFather: In Telegram, search for “BotFather”. This is the official Telegram bot for managing other bots.
Create a New Bot: Type
/newbotand follow BotFather's instructions. You'll need to choose a name and username for your bot.Obtain Your Bot Token: BotFather will provide you with a unique bot token. Keep this token secure! It’s like a password for your bot.
Setting up Your Backend to Handle Telegram Messages:
Choose a Telegram Bot Library: Select a library for your backend language (e.g.,
python-telegram-botfor Python,node-telegram-bot-apifor Node.js).Initialize the Bot: In your backend code, use the library to initialize your bot with the token you received from BotFather.
Defining Message Handlers (Command Processing):
Create Command Handlers: Define functions in your backend code to handle specific commands. These functions will be executed when a user sends a corresponding command to your bot.
Sending Updates and Notifications:
Use the send_message Method: Use the bot's send_message method to send text messages to users. You'll need the user's chat ID, which you can get from the update object in your command handlers.
Format Messages Clearly: Use Markdown or HTML formatting to make your messages easy to read.
Send Notifications for Key Events:
Trade confirmations
Order status updates (e.g., filled, partially filled, canceled)
Market alerts (e.g., price changes)
Account updates (e.g., balance changes)
Webhook or Polling:
Polling: Your bot periodically checks Telegram for new messages. This is simpler to set up but less efficient.
Webhooks: Telegram sends updates to your server in real time. This is more efficient but requires setting up a web server with a public IP address or using a service like ngrok for local development.
IV. Enabling Real-Time Communication using WebSockets
This section explains how to implement WebSockets for a dynamic user experience:
WebSocket Library Selection: Choose a WebSocket library compatible with your backend programming language (e.g., websockets for Python, socket.io for Node.js).
WebSocket Server Integration: Integrate the WebSocket library into your backend server to establish WebSocket connections with clients (user’s Telegram app).
Real-Time Data Feeds: Develop logic to push real-time data updates (prices, order book changes, trade confirmations) to connected users through the WebSocket server.
Subscription Management: Allow users to subscribe or unsubscribe from specific data feeds based on their interests (e.g., specific trading pairs).
V. Technology Stack and Security:
A. Programming Languages and Frameworks:
Backend development commonly uses languages like Python (with frameworks like Flask or Django) or Node.js (with Express.js).
B. Security: Robust security measures are paramount:
Secure Authentication (OAuth, JWT): Protecting user accounts from unauthorized access.
Data Encryption (SSL/TLS): Encrypting data transmitted between users and servers.
Regular Security Audits: Identifying and addressing potential vulnerabilities.
By understanding these components, you can build a robust and scalable trading platform similar to PVP.trade.
Remember that security is paramount in any financial application.
Community Features in pvp.trade
Clan System

Create/Join Clans: Collaborate and share insights with other traders.
Competitions: Use
/leaderboardsto see rankings based on performance.
Referrals: Send
/inviteto refer friends and earn points for rewards.
Financial Metrics
PVP.trade operates with a competitive fee structure:
Trading Fees
Futures Trades: A fee of 0.05% is charged on futures trades.
Spot Trades: A fee of 0.5% applies only on sells (no fees for spot buys).
Bridging & Liquidations: No fees are charged for bridging funds or liquidations.
Revenue Generation Potential
PVP.trade’s model suggests robust potential for growth through:
Trading fees from an active user base.
Future token sales (e.g., $PVP token), may provide additional revenue streams as user engagement continues to grow.
Want to build a product like pvp.trade?
If you’re a business owner, exchange owner (DEX or CEX), or developer looking to capitalize on this model and build a similar platform, we can help you build and launch within 60 days.
Reach out to us through:
LinkedIn | Telegram | Website | Book a Call
Let’s discuss your needs and launch quickly!
Conclusion
PVP.trade demonstrates the power of combining convenience and community in the trading world.
By leveraging Telegram’s widespread reach and user-friendly interface, it empowers both novice and experienced traders to participate in the market with greater ease and engagement.